


Brennan's sixth birthday party was this past Friday and it was a Wii Sports themed party. Because the Wii has Mii's, I created a Mii for each child at this site. I then used the Mii's to make tee shirts, personalize the envelopes for the invites and drinking straws, create a "Happii Birthday" bulletin board (I used painters tape and taped everything on my dining room wall instead of making a birthday banner), a chandelier decoration, decorate the front door and personalize cupcakes.
Here is a tutorial on how to make a Mii tee shirt. The first part is how to make a Mii online and then turn it into what you see in my picture of Jackson. (He picked the yellow sunglasses)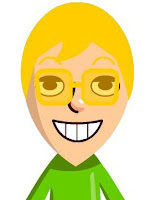 How to create a Mii from an online source and get it onto your computer so you can use it.
 How to create a Mii from an online source and get it onto your computer so you can use it.
- Go to makewee.com and create your Mii. Pick shirt color, face shape, hair color and style, eye shape, etc.
- When your Mii is how you like it, move your mouse away from the Mii, so it will not be in the picture in the next step (I did not do this and had to redo one of them).
- Hit "Print Screen" on your keyboard (to do this on my computer, I had to hold down a button that says, "fn" and is in a box on the bottom left side AND hold down "prt sc" which is in a box under the home button on the top right corner)
- Open PAINT
- Click on "Edit" and then click "paste". The entire screen from the Mii creater should be up in PAINT now.
- Click on the square with the dotted lines in the shape of a square. Then, use this feature to "cut out" your Mii. Your Mii should be inside the box.
- With your arrow (you know, from the mouse?) inside the Mii box, click on "Copy"
- Go up to "File", click "New" and don't save the old.
- Right click your mouse, "Paste" and your Mii should pop up!
- Click on the paint bucket and the white paint and fill in the blue around your Mii.
- Once your Mii is colored how you want it, click on "File" and "Save". Save it as a JPEG and you will be able to access it as a picture. I did this.
- From there you can resize it however you want. I copied my pictures into a word document so I could size them and have multiple pictures on one page. I then used these images (which I got printed at the UPS store for 0.30 cents a page) for all the things listed above.
 How to make a Mii Tee Shirt:
- I bought the teeshirts at Michaels when they had them on sale 2/$5. I was not spending a lot of money on this so this was perfect.
- Create your Mii and then size it to 5x7 in your picture program.
- Click print and select 2 5x7's. Make sure to see if your program offers an "iron on transfer" mode.
(A quick note...if you have writing you want to use in the iron on transfer, MAKE SURE TO REVERSE THE IMAGE! I forgot to do that for Baby Ethan's Mini Mii teeshirt :( ) - I printed out two Mii's per iron on transfer sheet (I used the Wilton brand from Michaels, normally $10, I had a 50% off coupon so I got 10 sheets for $5...just google "Michaels coupons" and I am sure you can find one, too). To print, follow directions that come with your transfers.
- Iron on following directions.

I decided to paint "Team Mii" or "Team Wii" on the backs of the shirts so here is how I did that.
- Cut out your word on a cricut using contact paper. I used Base Camp and cut the letters 2 1/2 inches for the best fit for the kids shirts.

- Put shirt on a big board (I used the top of a plastic storage bin. It was the perfect size and gave me a nice flat surface)

- Put some newspaper or something under the shirt so the paint doesn't get all over your lid.
- Place the stencil on the shirt, making sure to add the middle parts if you have to (like in my "a" and "e")
- Press firmly to make sure the stencil is totally pressed down and paint will only go where it is supposed to.
- Using a paint brush or sponge (I used a cotton ball b/c I did not want to have to wash a paint brush between shirts) dab paint (fabric paint is best) onto the stencil letters.
 Make sure you completely fill in the area and be careful not to get outside the stencil.
 - I then let the paint set about 1/2 an hour, removed the tee-shirt, laid it out for the day and repeated the process...TEN TIMES!


See how cute they are from behind?
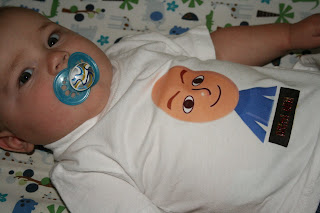
Ethan in his Mini Mii shirt...see that black box? Yep, I forgot to reverse the image, so the shirt said "iiM iniM" and I had to figure out how to fix it without making a new tee shirt (since I did not have any more)...a black box printed onto transfer paper and then puffy fabric paint was my solution!
Other posts about the Wii Party are here and here.


2 Words to brighten my day:
too cute!! I like the teams painted on the back - it adds the finishing touch!
You are so creative! Those are absolutely adorable!
Post a Comment